MOVING TIPS & ADVICE
How to Avoid Losing Screws When Disassembling Large Furniture: DIY Dismantling and Labeling Methods
Key answers
When taking apart wardrobes, bed frames, or desks, the biggest risk is losing screws and fittings. This guide shows how to bag, label, photograph, and check each part so reassembly is far less likely to go wrong.
Why Furniture Parts Go Missing So Easily
In Hong Kong, where homes are compact and moving dates are often tight, many people choose to dismantle large furniture themselves to save time and cost. But wardrobe screws, bed-frame bolts, dowels, corner brackets, and Allen keys can look similar while differing slightly in length or shape, which makes them easy to mix up once they are removed.
Another common mistake is the habit of putting everything down “for the moment” during the job. Parts are left on the floor, the sofa, or in one shared bag, then they get scattered during the move. Without a clear link between each fitting and its original position, reassembly becomes guesswork and may lead to stripped holes, crooked doors, or damaged boards.
Prepare Bags, Labels, and Photos First
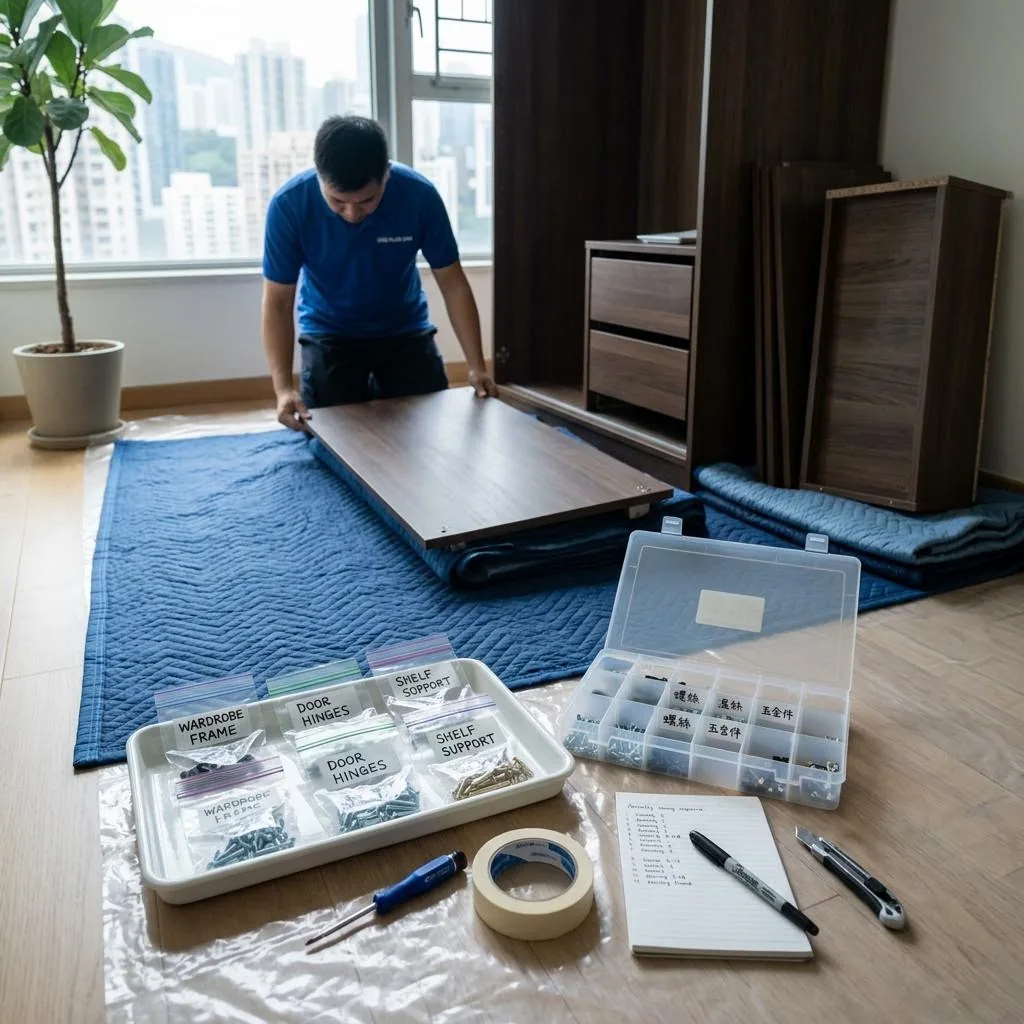
Before you start, gather clear zip bags, masking tape or labels, a thick marker, a phone, and a small tool box. The safest habit is simple: every time you remove one group of screws or one fitting, put that set into its own bag immediately and write the exact use on the outside, such as “master bedroom wardrobe left hinge.”
For more complex furniture, add numbering and colour coding. For example, A1 can mean the door set and A2 the drawer runner set, while blue labels mark the study and red labels mark the bedroom. Take photos of the full furniture, every joint, the direction of the fittings, and close-ups of the holes before dismantling, so you have a reliable reference when you rebuild it later.
A Practical Packing and Label System
The best rule is one component, one bag. Do not pour all screws into a single container. Each bag should hold only the screws, washers, brackets, plugs, and small parts for one exact section, then be taped to the matching board or placed in a dedicated tool box with a written contents list on the outside.
For panels that look nearly identical on both sides, words alone may not be enough. Add arrows for up and down, and mark “inside,” “outside,” “top,” or “bottom” on the board edge. If the manufacturer drilled the holes in a specific direction, keep that original orientation in your notes; otherwise, you may still end up with parts that technically fit but do not align correctly.
Dismantling Order and Common Mistakes
Start from the outside and move inward, and from top to bottom. Remove doors, drawers, adjustable shelves, and loose accessories first, then deal with the main structural fasteners. This reduces sudden weight shifts and makes the boards easier to control, instead of letting the furniture collapse while it is partly loosened. If the item is heavy, have two people support it before taking out the last fasteners.
Common mistakes include not taking photos, using the wrong screwdriver bit, mixing different screw lengths, forcing a stripped screw, and dragging boards across the floor. If a hole is already loose or a board edge has chipped, stop and assess it instead of forcing the fit. Electrical, gas, built-in structural, and other specialist technical work should be left to qualified professionals; do not attempt risky DIY on those parts.
Reassembly and On-Site Checks After the Move
Once the furniture reaches the new home, sort the boards by their labels and check the left-right, top-bottom, and front-back orientation against your photos. When reassembling, start by aligning the holes, then tighten gradually. Do not lock every screw fully at the start, because a slight angle error can crack the board when you apply force too early.
After assembly, inspect the doors, drawers, shelves, exposed screws, and any fresh scratches. If one section still does not tighten properly, stop using it and check whether a part is missing or the size is wrong. If the issue affects load-bearing structure, have an experienced furniture installer inspect it instead of continuing to force it into use.
When It Is Better to Use a Professional Mover
Not every large item is suitable for DIY dismantling. Custom cabinetry, oversized wardrobes, gas-lift beds, stone-top tables, or furniture with a lot of glass may be much riskier to handle on your own, especially if the corridor is narrow, the stairs are awkward, or the schedule is tight. It is better to judge the difficulty and the tools you have before you end up with one missing screw that stops the whole item from being rebuilt.
If you want a mover to help with dismantling and reassembly, ask in advance whether parts will be bagged and labelled, whether you need to empty the cabinets first, which furniture types need extra planning, and how missing parts or stripped holes are handled. Get important details confirmed in writing, and check Moving house price list and Service terms for scope boundaries so you do not assume a task is included when it is not.
Frequently Asked Questions
What is the minimum set of tools needed before dismantling large furniture?
At minimum, prepare zip bags, labels, a thick marker, a phone for photos, and basic screwdrivers. If the furniture uses several types of fittings, add a small tool box and tape for better sorting.
How do I stop screws from getting mixed together?
The most reliable method is one bag per component. Put only the fittings from the same section in each bag, then write the exact part name, orientation, and number on the outside.
What if the original assembly manual is missing?
Use your own photos and numbering as the reference. Take close-ups of the joints, hole positions, and fitting directions, then rebuild in reverse order of dismantling and test-fit before tightening fully.
What should I do if a screw hole is stripped or loose?
Do not force it tight. Check the screw size and the hole condition first. If the problem affects strength or load-bearing safety, ask a qualified professional to inspect it instead of improvising a repair.
How can I check whether the furniture has been reassembled properly?
Check alignment, drawer movement, stability, and whether any screws are exposed or loose. If the item wobbles, jams, or shows damage, stop using it and inspect it again before putting it into service.